
This shootout scene was Maverick’s main roadblock towards finishing Yakuza Kiwami on Legend Difficulty and platinuming the game.
1. Hold Your Horses at the Start of the Shootout
Not the most vital tip in this list, but it will still save you a few bullets. At the start of the shootout you can aim for the first enemy, but don’t shoot yet. Any shots you fire before the controls menu pops up will have no effect.
2. Aim for the Middle of the Circle
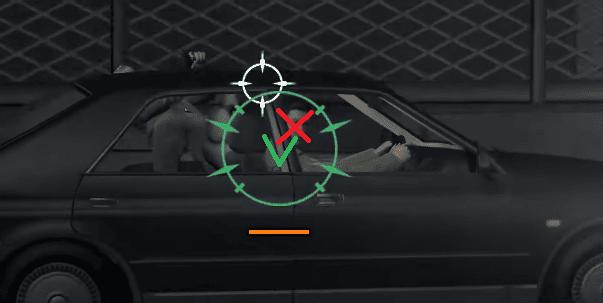
You deal significantly more damage by aiming in the middle of the circle. This is especially relevant for the car drivers, for who the middle of the circle and the head don’t quite match up. Taking out drivers quickly will prevent them from ramming Date’s car, saving much-needed health. Quite often it even allows you to ignore the other shooters of the vehicle.
3. Watch the Color of the Circle
The color of the circle of each shooter moves from green to yellow, then orange, then red. A shooter with a red circle will soon be shooting. You can use this information to prioritize targets, which is also the start of the next tip.
4. Prioritize Your Targets During the Shootout
As we mentioned before, you should prioritize targets with a dark (orange or red) circle. But even when there is no one about to shoot, there are still things to consider when deciding who to take out next.
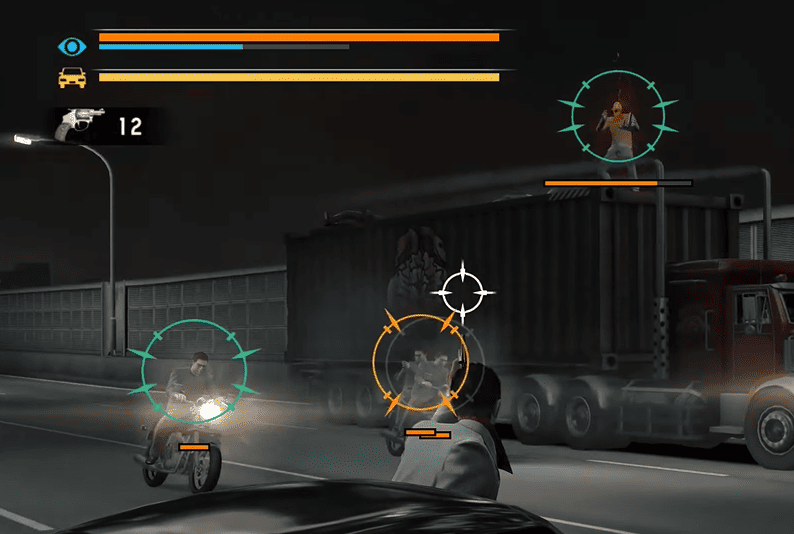
Your highest priority should be motorcycle passengers with a rocket launcher. These enemies are extremely dangerous.
Next are targetable drivers. When you shoot a driver, you will sometimes not even have to bother with the other shooters in the car or on the motorcycle. This tip will not always work, however, as some drivers only become targetable after you take out the other shooters in that car.
5. Save Heat Eye For the Shootout Parts Where You Really Need It
Constantly activating your Heat Eye ability will cause stuttering. For many parts of the shootout, you simply don’t need it. Saving it for when you do need it will allow you to use it longer. I suggest using it to adjust your aim when enemies have an orange or red circle.
6. Reload Before Taking Out A Driver
Once a driver becomes targetable, you only have a limited amount of time before he rams his car into Date’s. Needing to reload at this time would be very detrimental to success in the shootout. There is, however, a little trick you can use for most cars. Often, drivers only become targetable after you take out the other shooters in the car. If their circle is green, you can leave one shooter, reload, take him out and have plenty of ammo remaining for the driver.
7. You Don’t Have to Completely Take Out Enemies To Stop Them From Shooting
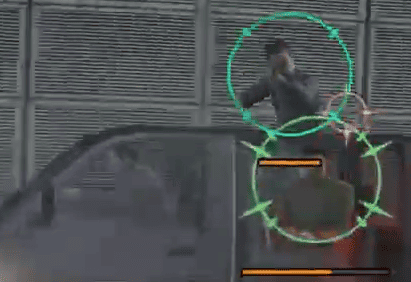
Shooting most enemies once or twice (depending on their total HP) resets their attack pattern, even resetting their circle to green. You can use this to your advantage on enemies with higher health, targeting them temporarily and then focusing on lower-health enemies. This is important for the machine guy in the truck (above), but especially for the machine gun enemy near the end (below).
8. Target the Middle Guy on the Truck First
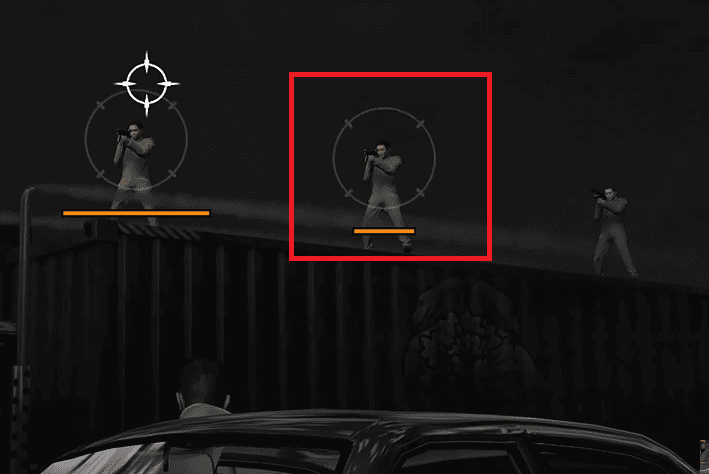
Prioritizing the guy in the image above will allow you to move on to the next scene. During that next scene, the left guy cannot target you. Don’t hesitate to shoot him once or twice when his circle becomes dark before the middle guy dies, however.
9. Shoot the Missiles, Not the Missile Launcher
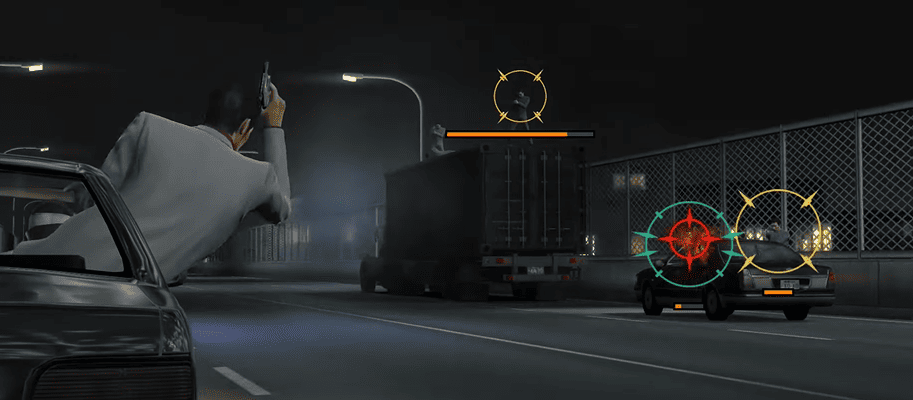
The enemy shooting missiles from the top of the truck is one of the exceptions to Tip 7. No matter how many times you shoot him, he’ll still fire off his missiles.
That means 2 things: 1) You want to focus on his missiles, not him. Shoot them down fast, as they have a tendency to go off-camera long before they get close to Date’s car. 2) You should focus on the other enemies instead in between missiles.
Of course, you CAN (and should) target him when no enemies are visible. Just don’t expect to fully take him out before all of the vehicles are out of the picture.
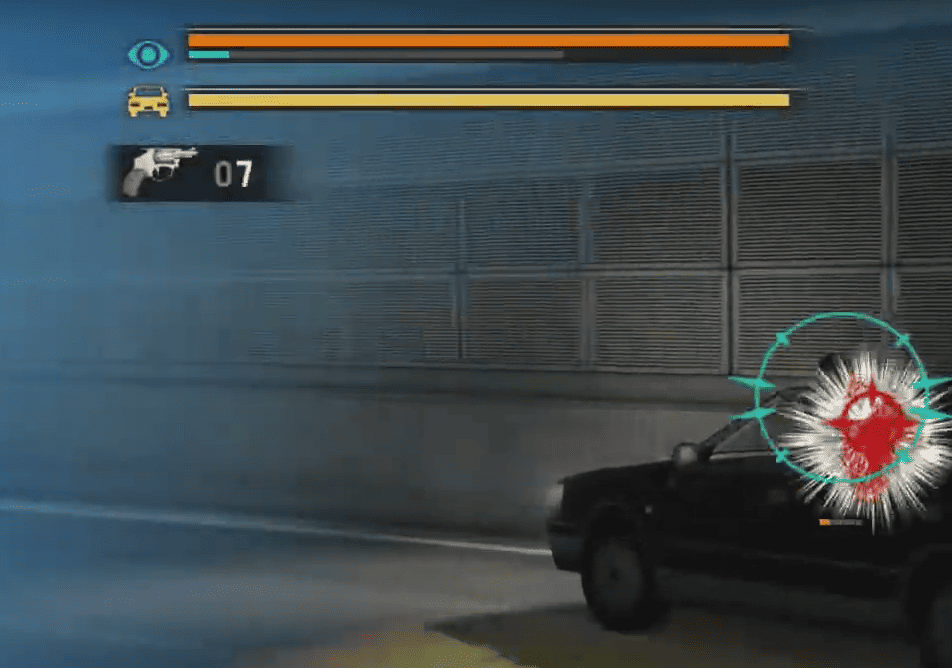
10. Juggle the Health of Kiryu and Dante’s Car

You will see different opinions on if it’s more important to preserve Kiryu’s health or the health of the car. The answer is that it depends on your own strengths and weaknesses. The car does not tend to take much damage from gunfire. Rockets are a different story, however! These should not be hitting you OR the car!
The final enemy in the truck will not take out your full health by ramming you, but each hit takes out a good 60%. For this reason, I prefer to keep Kiryu’s health over 60% if possible. This will allow me to use Heat Eye on the last enemy without worries. As an extra bonus, the car does not tend to take much damage from gunfire. Make sure to keep the cover button pressed when Kiryu needs to dodge gunfire, or he will pop out of the window again on his own.
Failing to keep Kiryu over 60% health, it’s fine to use him as a meat shield, as long as he doesn’t die. There is no real difference between reaching the last enemy with 59% health or 1% health. Having either Kiryu or the car above 60% health gives you an extra life (assuming you use the cover function correctly). Having both at above 60% gives you 2 extra lives (and the luxury of being allowed to mess up the cover function once).
One life CAN be enough to take out the first enemy. It’s a bit unlikely, however, especially if you’re a bit nervous, so every bit helps.
11. Allow Heat Eye to Fully Load during Quiet Moments of the Shootout
During quiet moments while fighting a single enemy, you can potentially keep them alive while allowing Heat Eye to fully load for the next phase of the shootout. The main opponents that come to mind are the high-health enemies on top of the truck. You can use this trick for both the rocket launcher and machine gun guy. This is more of an advanced tip with not as much benefit as some of the others, however. It could also backfire, so don’t feel forced to use it.
Bonus Shootout Tip For PC Users: Use a Mouse
Real Yakuza may be using a Gamepad, but you can afford to temporarily not be a real Yakuza if the shootout frustrates you. Seriously, though: while most of Yakuza Kiwami leans itself to a controller, I found the shootout significantly easily using a mouse.
Video Guide
As a final resort, you can combine the above tips with a video guide. I found the above one by Tash I the best one. He prioritizes targets well and indicates this priority visually, so feel free to pause regularly! I do have one nitpick, though. He mentions aiming at necks, for which your mileage will vary depending on the enemy. I find aiming in the middle of the circle to be more effective. Aiming for the neck is definitely superior to aiming for the head, however.
Conclusion
Look, I do think the above tips are solid, but I know it’s not enough to magically make you succeed right away. The shootout is the most frustrating part of Yakuza Kiwami for most players, especially on Legend Difficulty. But you are allowed a few small mistakes each try. You just need to limit the total amount of mistakes. By using these tips and continuing to practice, you’ll get further and further. Eventually, you WILL make it. You got this!